Setup and configuration of ProCall NEX
April 2025
ProCall NEX
Enter licence and activate services
UCConnect
A general guide to the UCConnect portal and the first steps for setting up services can be found here: Best practice: Activating and setting up services via UCConnect
Activate ProCall NEX
Account
Create an account or log in to the UCConnect portal with your existing account.
Server account
Create a new server account.
Assign alias
You can name the alias as you wish.
Licence
Add the ProCall NEX Bundle licence there.
You can also apply for test licences directly via the portal.
Your sales contact can also provide you with test licences themselves.
Wizard for commissioning
After entering the licences, follow the guide through the wizard for the first commissioning.
At the end of the commissioning process, you will receive
- an e-mail with important information
a password for the ProCall NEX administration
Make sure you save this password.- ProCall NEX - downloads and instructions
Your ProCall NEX instance is now being set up in the background together with the telephony (telephone system and SIP trunk) . This may take a few minutes.
Download des Administrationstools
Download theProCall NEX Server Administration tool .
After installing theProCall NEX Server Administration tool , you can log in to your ProCall NEX instance and set up ProCall NEX.
ProCall NEX Server administration
You can easily install the ProCall NEX Server Administration tool locally using the corresponding installation package.
After installing the ProCall NEX Server administration, you canopen the administration interface via the start menu .
The functional scope of ProCall NEX and the options offered in the administration interface are determined by the licence for the selected ProCall NEX bundle.
If you are missing specific configurations, please get in touch with your estos contact person.
UCConnect ID und Administrator Login
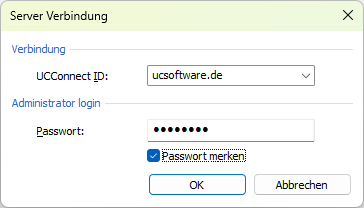
In the dialogue box that appears, enter the UCConnect ID or alias of the server account to which you want to connect and the password that you were given during commissioning.
Screenshot example - ProCall NEX Server administration - Server connection - UCConnect ID and administrator login

The settings for the UCConnect ID and password can be saved locally if the "Remember password" tick has been set. This allows you to manage different customers via the ProCall NEX Server Administrator. Use the drop-down menu under UCConnect ID to find all the customers you have already connected to.
Nach Installation des Administrationstool ProCall NEX Server Verwaltung können Sie sich an Ihre ProCall NEX Instanz anmelden und ProCall NEX einrichten.
Download the clients/apps
Communicate login data for apps/clients
Bitte beachten Sie, dass Sie in der ProCall NEX Verwaltung gezielt die Dienstberechtigungen für Benutzer, Gruppen oder global festlegen müssen, um ihnen die Nutzung der ProCall App für Web zu ermöglichen.
Für die Anmeldung an ProCall NEX können sich Benutzer über Benutzername/Passwort und UCConnect ID oder Alias anmelden.
Stellen Sie daher sicher, dass die Benutzer diese Informationen erhalten.
Local installation - ProCall Client for Windows
Only the ProCall Client for Windows is special in this context because it must be installed locally on the user's workstation.
During installation, you will be asked whether the client should connect to ProCall NEX.
Select this option and enter the UCConnect ID or the alias of the ProCall NEX server account.
Recommended: Roll-out of updates automatically
If you install the update service (recommended) during installation,automatic updates are also made available to the user .Online meetings/video conferences with ProCall Meetings
From the "Professional" package of ProCall NEX, video conferences can be used via ProCall Meetings.
Please note that you must specifically define the service authorisations for users in the ProCall NEX administration to enable them to use video conferencing with ProCall Meetings.
Detailed instructions on this functionality can be found here:Quick start: Participate in a meeting with ProCall Meetings
Weiterführende Informationen
Manage Voice Services - Web Admin
ProCall NEX - downloads and instructions
Setup user management with Microsoft Entra ID
Integrate contact data with MetaDirectory
Setting up the interactive voice menu (IVR) in ProCall Voice Services
Checklist for the successful implementation of ProCall NEX in the estos partner portal my.estos.de (available language: German)