PBX-specific configuration: Setting up softphone functions (SIP) for bis. cloud PBX – connection instructions
October 2023
| ProCall 7 Enterprise | from V 7.1.5 |
|---|---|
| Cloud PBX | bis. cloud |
Notes on the estos test environment
The softphone functions (SIP) of ProCall were tested in the estos test environment with the telephone system specified above. The tests were performed with a maximum of two lines per SIP end device. The following information was used when setting up the telephone system for logging in/registering the individual SIP lines to the UCServer.
UDP connections
Only UDP connections are supported for the connection of SIP lines.bis. cloud SIP accounts
The SIP accounts to be set up for the use of ProCall Enterprise are to be administered via the .bis cloud web interface.
Menu item Call Manager – Settings – Accounts
After selecting the Accounts menu, a further menu item SIP Accounts is available, via which the configured SIP accounts are listed.
Example screenshot to. cloud Call Manager accounts

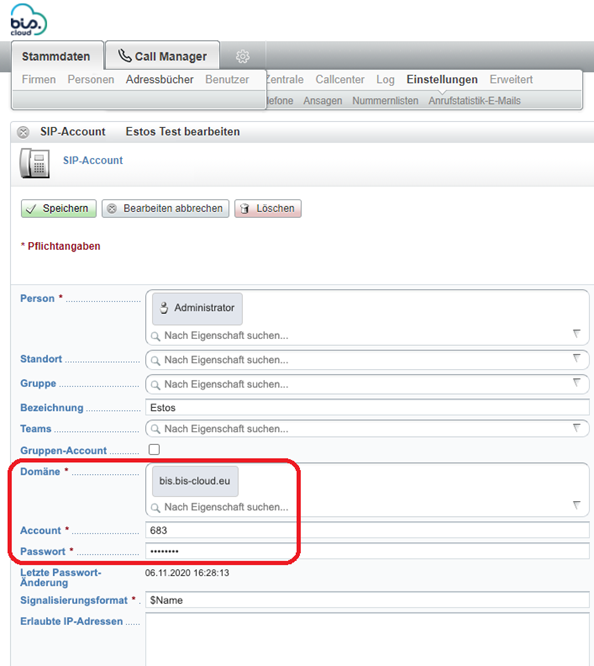
If a SIP account is opened for editing, the information required for setting up the SIP lines in the estos UCServer administration can be determined:
Domain
when creating the softphone lines in the estos UCServer administration under Registrar/IP address.
Account
to be entered in the estos UCServer administration under username(s) when creating the softphone lines.
Password
to be entered under Password in the estos UCServer administration when creating the softphone lines.
Example screenshot: SIP account – domain account password
Reserve SIP accounts exclusively
If a SIP account is intended for use as a SIP line in estos ProCall Enterprise, it must be ensured that this SIP account is not used on another end device or in another application. This means that the SIP accounts to be used for registering SIP lines must be provided exclusively for the estos UCServer. Multiple simultaneous use of SIP accounts leads directly to signaling errors.
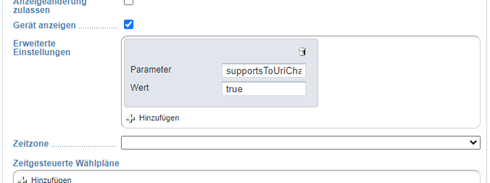
To ensure that the call window on the forwarding destination is filled correctly when a call is forwarded, the SIP accounts must be assigned the parameter supportsToUriChange with the value true. You add this parameter to the SIP accounts under Advanced settings:
Example screenshot: Advanced settings
UCServer configuration
The settings are made in the UCServer administration:
Setting up the telephone system connection
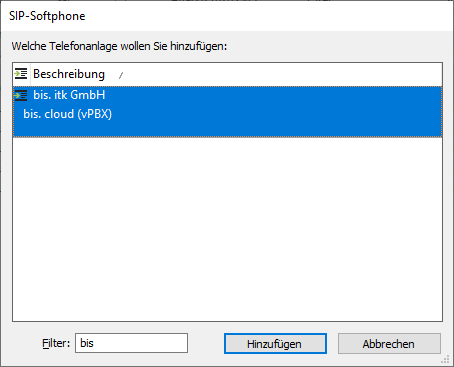
Enter the connection to the telephone system as "SIP softphone" with the type "B.I.S. telephone systems - bis. cloud(vPBX)" under "Lines".
Example screenshot UCServer Administration – Telephony – Lines
Enter the registrar/IP address and port in the input line as stored in the .bis Cloud web interface under Domain. (see above.)
The default setting for Reregister after 600 s is a workable value. Although the maximum value accepted by the provider is 3600 seconds, settings of more than 60 seconds in the bis. cloud web interface will always provide a warning message:
Warn. long register interval...
If more than (in the order of) 25 SIP lines are to be registered, reducing the Register delay of 300 ms is not recommended in order to achieve a better-distributed registration renewal. However, increasing this value may be necessary to avoid blacklisting by the vPBX in the case of a large number of lines.
NAT Refresh
Depending on the connection technology from the internal network via the internet to the provider of the virtual PBX, it may be necessary to reduce the value of the NAT Refresh setting in order to prevent the virtual PBX from no longer being able to establish contact with the estos UCServer from the outside, e.g. because the UDP connection has been closed in the meantime by a NAT router or a firewall or the NAT UDP mapping has been deleted.
Softphone registration
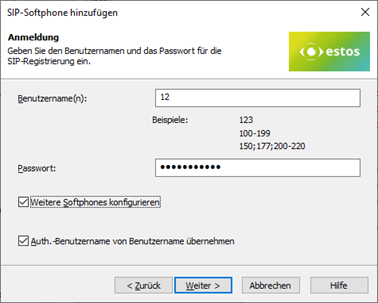
For the connection to the cloud PBX of B.I.S Informationssysteme enter here as:
- Username(s): the specification "Account" as stored in the vPBX (see above)
- Password: the "password" as stored in the vPBX (see above)
Auth. username from username is always activated here.
Example screenshot: Add SIP softphone
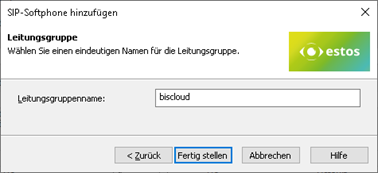
Define a name for the line group
After the SIP lines have been added to the line group, a unique name must still be entered for them: <line group name>.
Example screenshot: Name line group
Then set up the location and telephony details in UCServer Administration:
Configure location
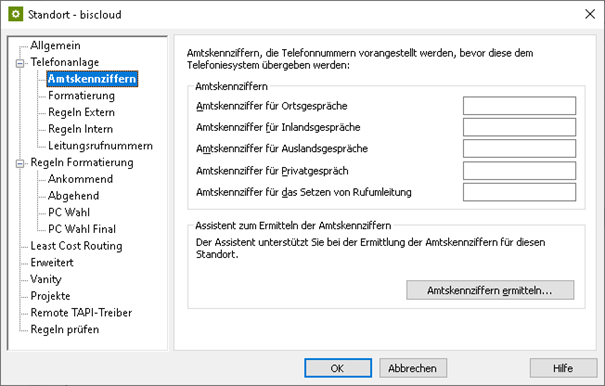
Set up a suitable location in the "Location" with the information on exchange codes, area code, system call number, and extension range.
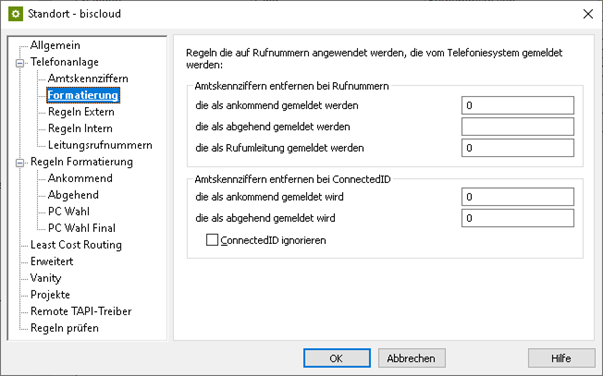
The following rules for exchange code processing and formatting were found to be suitable in the test connections to the bis. cloud PBX, but could also deviate from them due to customer-specific connection variants and require readjustment.
Example screenshot: Location – office codes
Example screenshot: Location – Formatting
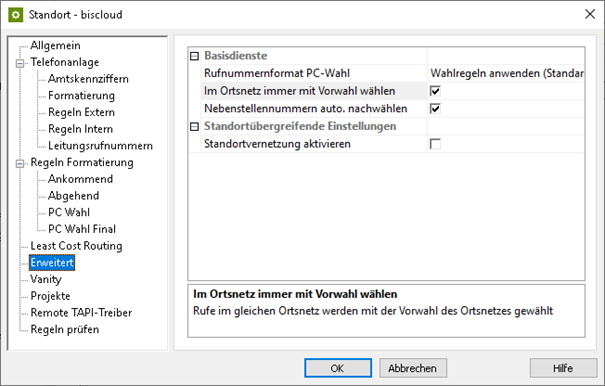
Example screenshot: Advanced – Basic services
Formatting
Make sure to set the phone number format PC dialing to Apply dialing rules (default) under Advanced – Basic services and activate the Always dial with area code in the local network option:
Configure line group
Using the context menu of the line group you can reach the menu item Properties.
Open the properties of the line group with the name you defined above under <Line group name>.
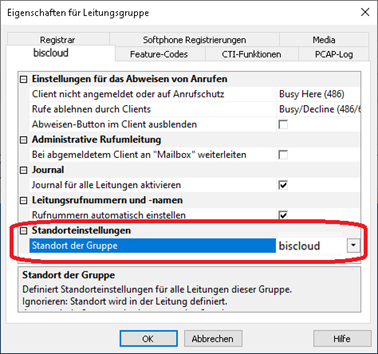
Enter the previously created location here under Location settings.
Example screenshot: Properties for line group – location settings
Configure feature codes/Define pickup
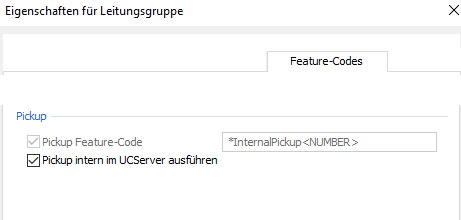
On the Tab Feature codes under Pickup you can configure how a call is picked up (Pickup).
Pickup via UCServer
(from ProCall 8 Enterprise V 8.3)
- In the section Pickup the Pickup can be executed internally in the UCServer .
This enables the UCServer itself to pick up a call, which provides improved functionality and does not require call group management within the Cloud PBX.
Example screenshot Properties for line group - Feature codes - Execute pickup internally in UCServer
Pickup via feature code
Alternatively, you can pick up calls from the telephone system.
To do this, you must enter the valid Pickup - Pickup feature code for the telephone system under Short dial code .
The extension from which the call is to be picked up is specified as a variable with <NUMBER>, for example with the character string *8<NUMBER>. However, the feature code can also be configured differently on the system to be connected.
Prioritize audio codecs
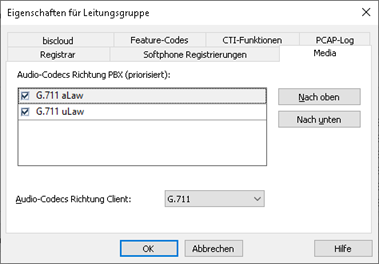
On the Media tab, make sure to enable both audio codecs towards PBX with the following prioritization:
- G.711 aLaw (1. Position),
- G.711 μLaw (2. Position).
In the setting option for the audio codecs towards the client, the codecs G.711 and Opus are available. Here you select the codec that ideally meets your requirements.
Example screenshot: Properties for line group – prioritize audio codecs
Call protection and call forwarding in the bis. cloud
The estos ProCall Enterprise UCServer offers numerous mechanisms for presence management. Likewise, the bis. cloud vPBX offers comprehensive options for controlling the management of call protection, unconditional or conditional call forwarding, etc. via the web interface or speed dial codes.
Please note that there is no synchronization of used features between these two systems bis. cloud and estos UCServer. For example, an activated estos ProCall Enterprise call protection is not displayed as activated DND in the web interface of the vPBX. For example, call forwarding activated in the vPBX web interface is also not visible on the estos ProCall Enterprise page.
In general, features activated in the bis. cloud are processed with priority over activated estos UCServer features. For example, an immediate call forwarding set in the vPBX is processed with priority over an immediate call forwarding activated in the estos UCServer.
Verified short codes
The bis. cloud virtual PBX offers numerous functions via speed dial. The following functions were tested and successfully verified.
| Function | Speed dial code | Comment |
|---|---|---|
| Caller ID suppression on | *31 | |
| Caller ID suppression off | *32 | |
| Activate forwarding immediately for the calling route | *72*[Phone number] | |
| Disable forwarding immediately for the calling route | *72* | |
| Activate forwarding by time for the calling route (time in seconds) | *72*[Phone number]*[Time in s] | |
| Disable forwarding immediately and after time for calling route | *73* | |
| DND for route on | *76 | |
| DND for route off | *77 | |
| DND global on | *78 | |
| DND global off | *79 | |
| Answer ringing call in the same domain | *80 | |
| Answer the call for extension phone number | *8[Phone number] | SIP line group: Pickup Feature-Code *8<NUMBER> |
| Listen to the route answering machine | *99 | |
| Call route answering machine | *990 | for use as call forwarding destination in estos ProCall Enterprise client |
| Record new greeting on route answering machine | *991 |
Known features, limitations or problems
Call number display after forwarding
In the case of call forwarding, only the caller's phone number is transmitted to the forwarding destination, the call window does not show any information about the originally called extension at the forwarding destination. The information from which the extension was forwarded is not signaled by the vPBX to the forwarding destination.
Version note
Since estos has no influence on the further development of the supported telephone systems by the manufacturer, we cannot guarantee that the instructions described above will also be fully valid for future releases.
Further information
Supported telephony functions for ProCall Enterprise with bis. cloud