Best practice: Data migration of UCServer database SQLite <-> Microsoft SQL server
March 2023.
ProCall 7 Enterprise and ProCall 6 Enterprise (EOL)
This best practice guide uses the example of ProCall 6 Enterprise (EOL) to describe the procedure for transferring journal and chat data (Chat V 2.0) during a database migration, for example when migrating the UCServer to another server operating system.
Note on ProCall versions
SQLite is used from ProCall 6 Enterprise.
For other ProCall versions or for update procedures from e.g. ProCall version 5, where Microsoft Access was used for data storage, these instructions are not provided.
A database conversion and the use of this best practice guide requires detailed expertise and appropriate permissions!
Note that you should always make sure to create backups of the components you are using so that you can return to a working state.
Introduction
Relevant database tables
The following database tables for the transfer of ProCall 6 Enterprise data are relevant for the administration and the migration scheme described below:
| Table name | Type of data stored | SQLite database |
|---|---|---|
ChatConversations | Chat | CtiServerDatabasechat.db |
| ChatEvents | Chat | CtiServerDatabasechat.db |
StringProperties | General | CtiServerDatabasechat.db |
| ValueProperties | General | CtiServerDatabasechat.db, CtiServerDatabasejournal.db, CtiServerDatabaseoffline.db, CtiServerDatabasetracker.db, CtiServerDatabasetask.db |
| journal | Journal/Chat | CtiServerDatabasejournal.db |
| offline | Journal | CtiServerDatabaseoffline.db |
| tracker | Journal | CtiServerDatabasetracker.db |
| task | Scheduled calls | CtiServerDatabasetask.db |
As of ProCall 7 Enterprise, there are even more tables:
| Table name | Type of data stored | SQLite database |
|---|---|---|
| BinaryTransferMetaData | Chat (Filetransfer) | CtiServerDatabaseBinaryTransfer.db |
ClientPersistenceItemStore | Presence profiles, Call forwarding profiles, Data for live chat clients | CtiServerDatabaseClientPersistence.db |
SQLite
Depending on your configuration, these can be found in different locations. If you have selected the option "SQLite" under "Database" in the UCServer administration, a local SQLite database with the default name "CtiServerDatabasechat.db" is created in the subfolder "Database" of the UCServer installation directory.
Microsoft SQL Server
If, on the other hand, you have a Microsoft SQL Server (Express) in use and are already using this as your primary storage location, the above-mentioned tables will be added to this database. Since you can define the name of the database yourself, you may have to look it up in the administration. For the sake of simplicity, this document assumes the default database name "CtiServerDatabase".
The document describes the import procedure via an additional temporary auxiliary database. The reason for this lies in the different data types of the two database systems. In principle, a direct import into the equivalent SQL tables would also be possible by writing a user-defined SELECT statement with explicit CAST operators. However, due to the large number of columns, this method is only recommended for experienced SQL administrators.
Data migration
SQLite → Microsoft SQL Server
For the following steps, it is usually necessary to be logged in with administrator rights on the respective Microsoft Windows computer.
ODBC connection to the current SQLite database
For the data transfer itself, an ODBC connection to your current SQLite database is required.
The driver from Christian Werner is perfectly sufficient for this: http://www.ch-werner.de/sqliteodbc/ (released under a BSD-type license). The driver is offered as 32-bit and 64-bit versions. Download and install the driver on the system on which you will later run the SQL Server Management Studio. It is important that the driver matches the architecture of SQL Server Management Studio.
Stop UCServer service
Stop the "estos UCServer" service so that no conversations are lost during migration.
Create ODBC connection to the SQLite database
On the system where SQL Server Management Studio will be run later, create an ODBC connection to the SQLite database.
To do this, open the "ODBC Data Source Administrator" of Microsoft Windows (odbcad32.exe).
- 64-bit: Subdirectory\System32
- 32-bit: Subdirectory\SysWOW64
Note: Depending on where you start "odbcad32.exe", you may only be able to configure 32-bit or 64-bit drivers with it. If necessary, also start this program with admin rights.
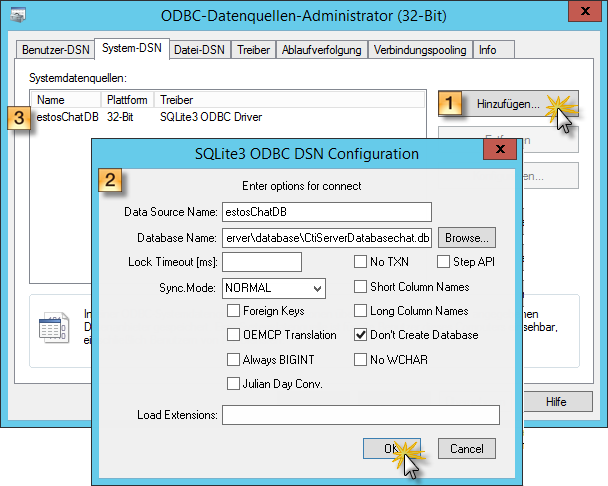
Create a system-wide Data Source Name (System DSN).
Example of a new ODBC connection – ODBC Data Sources Administrator (32-bit) SQLite ODBC DSN Configuration
If you cannot or do not want to run SQL Server Management Studio on the server where the UCServer is installed, it is recommended to create a file share or copy the file to a location from which you can access it from both servers.
Start UCServer service/administration of the database
Start the "estos UCServer" service again, then open the UCServer administration and select the item "General/Database" from the navigation.
Change the administration to "Microsoft SQL Server" and enter your company-specific connection parameters. Your SQL database is now initialized and the tables with all schema information are created.
Apply the new settings with the "Apply" button in the toolbar. Please additionally pay attention to any error messages.
SQL Server Management Studio
Now switch to the "SQL Server Management Studio" application. Log in with the same credentials you have used before.
Locate the newly created database and right-click on it to launch the tasks from which you want to start the import wizard.
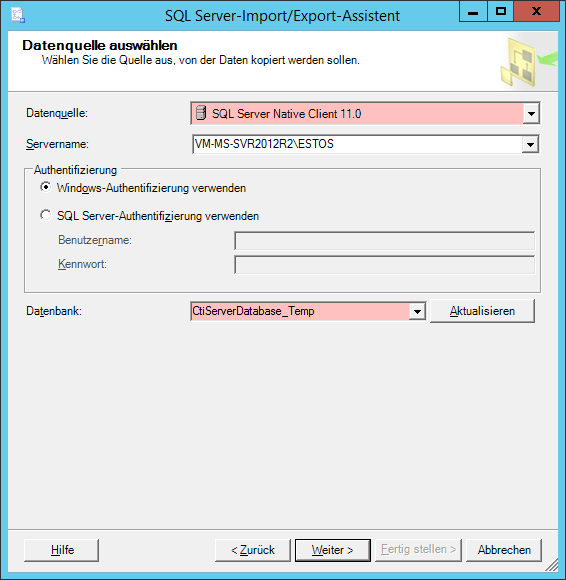
Specify data source
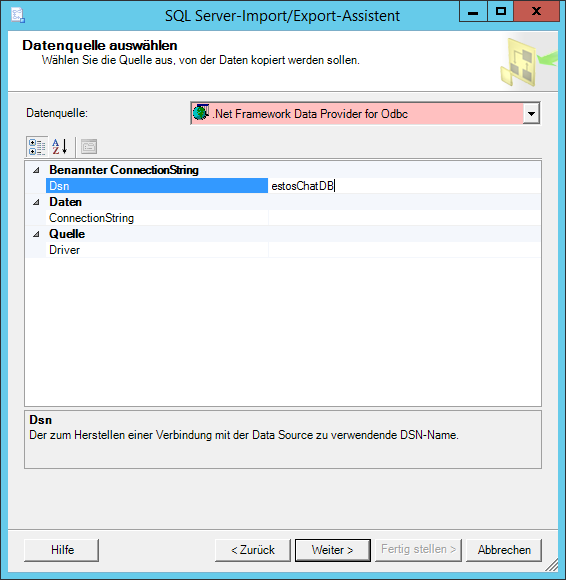
Enter ".Net Framework Data Provider for Odbc" as the data source and enter your previously assigned System Data Sources name for "Dsn".
Example: SQL Server Import/Export Wizard: Data Source and Dsn
Select the temporary target database
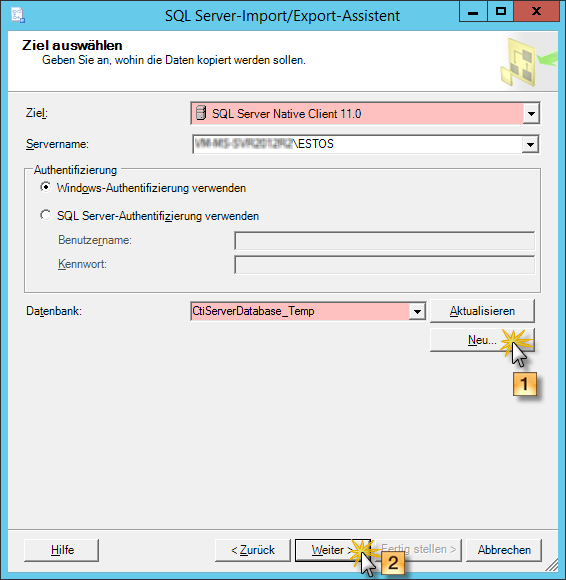
In the next step, select a new (temporary) database for intermediate import as the target database. To do this, click on "New...".
Example: SQL Server Import/Export Wizard: New...
Copy data
Then select the option "Copy data from at least one table or view".
Select source tables
In the next step, you can select the source tables. Mark all tables with a checkmark, which are listed under the introduction of the relevant database tables.
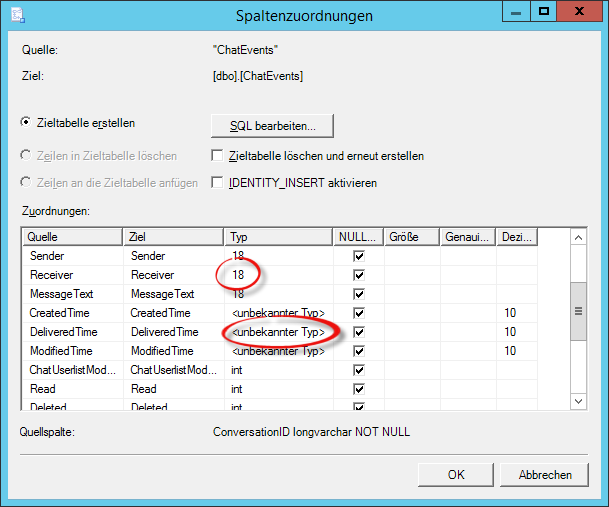
Before proceeding with the wizard, it is now mandatory to adjust the Microsoft SQL specific target data types for correct automatic conversion. Otherwise, the import will fail! Find all unrecognized data types in all tables and replace them!
For this, compare the automatically generated original tables in the "CtiServerDatabase" and use the same data types.
The replacements should generally be limited to two data types.
Source data type | Target data type |
|---|---|
18 or text (1) | nvarchar |
unknown type | datetime |
(1) Dependent on the Microsoft SQL version used
A previously displayed type "text" must therefore be changed to the type "nvarchar"!
Example: Column assignments of 2 columns
Start import
Follow the wizard until you can finish it by clicking "Finish". All records should be able to be imported without problems, which can take several hours! If this is the case, you can start with the actual import of the data.
Temporary SQL database
Run the import wizard again. This time the source database is your temporary SQL database itself.
Example of SQL Server Import/Export Wizard: Temp. DB
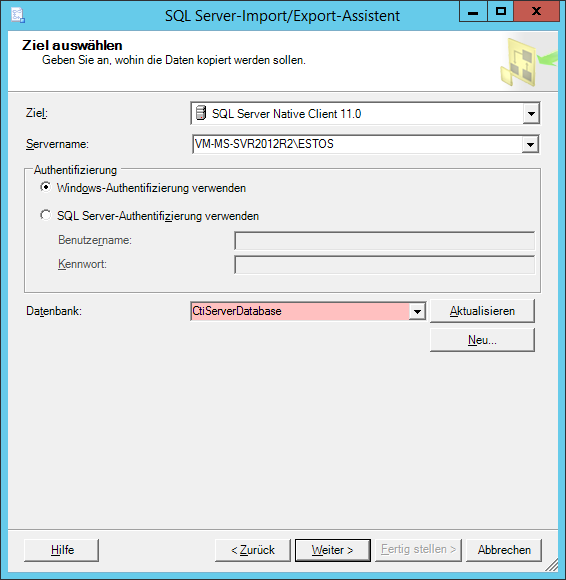
Select a productive database
Now select your actual productive database as the target.
Example of SQL Server Import/Export Wizard: Prod. DB
Copy data
In the next step of the wizard, select the "Copy data from at least one table or view" item again.
Select tables
In the next dialog select all tables.
It is important in this step that the option of the two tables "StringProperties" and "ValueProperties" are modified.
Example of table modification: Column assignments – Delete rows in target table and activate IDENTITY_INSERT if necessary
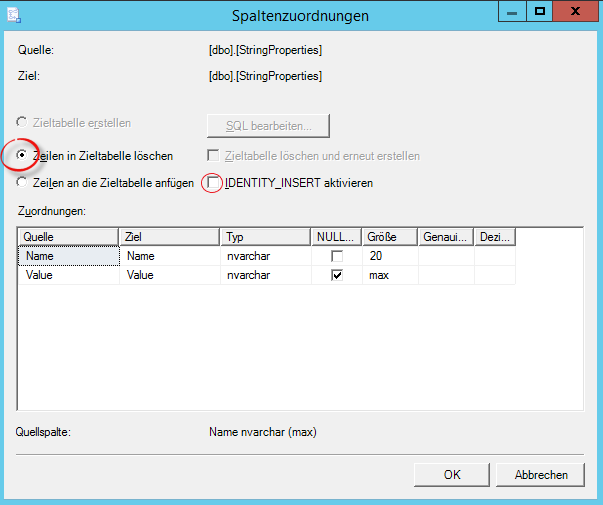
If the wizard returns an error regarding writing to TabIndex column and the task cannot be completed, you should enable IDENTITY_INSERT if necessary.
Exit wizard
The remaining pages of the import wizard can be skipped and the default settings can be kept. Then exit the wizard and all records should be imported correctly.
The import runs many times faster with this step.
Delete temporary database
Delete the temporarily created database again and then make sure that the users can log in again.