Best practice: Setting up the UCServer for ProCall mobile apps
Valid for:
- ProCall 7 Enterprise
- ProCall 6 Enterprise
To make the ProCall mobile app usable for users, some configuration and authorization settings must be made administratively.
A distinction must be made as to whether access should only be internal (in the local network) or external (outside the company's own network) and which functions/services should be used.
Accordingly, you must ensure that the UCServer can also be accessed externally (outside the company's own network) for the ProCall mobile app via the internet.
This manual describes some options for setting up the UCServer and contains information on setting up any additional components required for using the mobile apps in the local network and via the internet.
Best Practice
The procedure for setting up the ProCall mobile apps described in Best Practice requires detailed expertise in IT, network architecture, STUN/TURN, IP connections and appropriate authorization for configuration and administration.
Easier setup via UCConnect and ProCall Mobility Services
ProCall mobile apps can be put into operation more easily via UCConnect and ProCall Mobility Services, even without detailed specialist knowledge.
1. Introduction
ProCall Enterprise can be used platform-independent and cross-device and offers native apps/clients for macOS, iOS, and Android in addition to the client for Microsoft Windows.
With ProCall mobile, the native apps for iPad, iPhone, and Android, users on the move can also access selected and proven features of the unified communication & CTI software suite ProCall Enterprise.
The functions can be divided into two basic areas:
1.1. UCServer's functions
- Presence
- TextChat
- Contact information/search
- Telephone control (call forwarding, remote office ...)
- Audio/Video communication
- Softphone functions (SIP)
1.2. Voice and image transmission Audio/Video
Note on audio/video and softphone: Fixed IP addresses for UCServer and UC media server
If you want to use audio/video chat and/or softphone functions, the responsible UCServer component requires a permanently assigned IP address for communication.
If the computer on which the UC server is installed has more than one IP address and/or multiple network cards, the UC media server must be assigned an IP address for communication with the telephone system.
In estos UCServer administrator, open the Tools – Network interfaces menu. Double-click to open the UC media server settings and select the desired IP address.
Sample screenshot: estos UCServer Administrator – Tools – Network interfaces
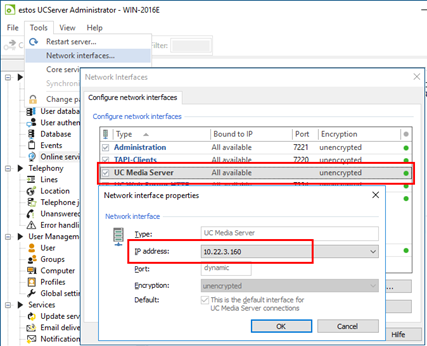
Save the settings and restart the UCServer service.
2. Use mobile apps only in the internal network
All of the above functions are available for both ProCall clients and ProCall mobile apps after installation and setup of the UCServer in the internal network.
Activate notifications
To ensure that messages and calls are displayed on the cell phone even when the app is in the background or the smartphone is locked, the mobile apps must be notified of incoming messages and calls via push messages – regardless of the functions used.
Push messages are sent from the UCServer to the estos push server on the internet, which transmits the notifications to the corresponding Apple (iOS) or Google (Android) services. From there the push messages are sent to the respective target device.
2.1. Setting up push notifications
For this function, it is absolutely necessary that the UCServer has a connection to the internet. An additional license is not required.
Accept the push policy
To enable notifications, you must agree to the push policy.
2.1.1. Set up firewalls
The firewall on the UCServer computer and on the gateway to the internet must be set up so that the UCServer is allowed to send push messages to:
ucpush.ucconnect.de on Port 443
It is not necessary to receive data from the internet.
2.1.2. Set up UCServer to send push messages
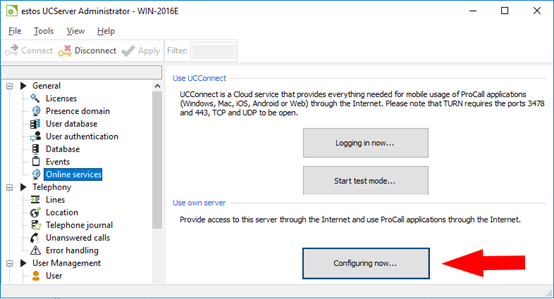
Start the UCServer administration.
Open General – Online services.
Under Use own server, start the wizard for the configuration by clicking on the button Configuring now...
Sample screenshot: estos UCServer Administrator – General – Online services
When the wizard is started for the first time, the privacy policy and agreement for DPA (Order Data Processing Agreement) are displayed.
Sample screenshot – Accept contracts: privacy policy/data processing and usage of push services
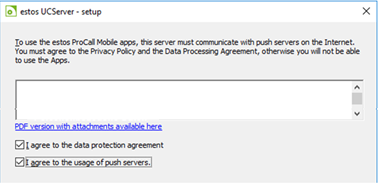
Both must be approved before the push services can be used.
Click Next to continue the wizard.
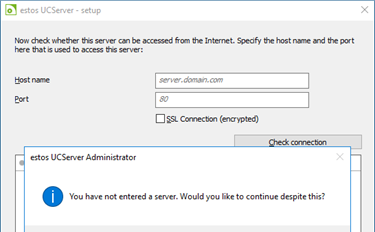
Since the mobile apps should not access the UCServer from the internet, the next window without specifying the hostname can be skipped with Next and the notification message with Yes.
Sample Screenshot: UCServer setup without entering a server
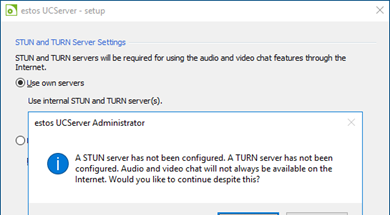
If you don't want to use audio/video chat or softphone functions either, you can also close the last window without any information by clicking Finish and skip the message with Yes.
Sample screenshot: estos UCServer setup – no STUN/TURN server
The setup of UCServer for sending push messages is complete.
The procedure for setting up and managing users and mobile apps is explained in Chapter 4.
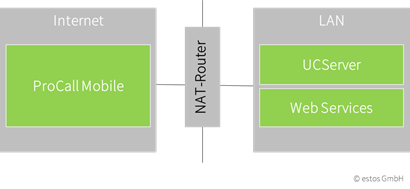
3. Use mobile apps externally via the internet
If access via the mobile app is also to be possible from outside the local network, the corresponding services/interfaces of UCServer must be accessible from the internet.
A distinction must also be made here between the use of:
- Presence, text chat, phone line control, and contact search
To do this, the UCServer web services must also be accessible from the internet. - Voice and video transmissions (audio/video and softphone)
In addition to the UCServer WebServices, a STUN and a TURN server must be accessible internally and externally.
In both cases, the sending of push messages (see 2.1) is additionally required.
3.1. Requirements for the UCServer release
Regardless of the extent to which the services of UCServer are to be made available for external use, the following requirements must be met to release the UCServer.
3.1.1. Public IP address and DNS entry
Public IP address
Your internet access must have a public IP address. Preferably, it should be a static (fixed) IP address.
DNS Entry
A DNS entry is useful for easier configuration of the connection in the mobile apps, but the IP address can also be used for configuration.
UCServer
It should be possible to resolve the name of the UCServer (e.g. ucws.domain.com) both in the internal network and on the internet via DNS since otherwise, the mobile apps would require different connection data.
On the internet, the public IP address must be returned, whereas the local IP address must be returned in the LAN.
Custom STUN/TURN server
If a custom STUN/TURN server is used, it must be possible to resolve this name both internally and externally. In both cases, the external IP address must be returned.
Add one DNS A record to your domain at a time e.g. ucws.domain.com and/or turn.domain.com.
If no fixed IP address is available, a corresponding DNS entry MUST be entered in the internet DynDNS, e.g. ucws.domain.com -> external IP address.
Automatically configure the server address in the mobile clients (optional)
You can make it easier for your users to set up their ProCall mobile client. The mobile client can automatically query the public address of your UCServer required for login via a DNS server entry. The user only needs to enter a user name and password.
DNS-SRV Entry
In addition to the A-record for the UCServer, set up the following DNS-SRV entry for your domain:
| DNS SRV entry | |
|---|---|
| Name | _ctiwebserver |
| Protocol | TCP |
| Target domain | Public domain or IP address of the UCServer e,g, ucws.domain.com |
| Target port | Public port of the UCServer HTTPS Port: 443 or 7225 |
| Example: _ctiwebserver._TCP.domain.com | |
Information about the required ports can be found in Chapter 3.1.3 Required Port and Firewall Rules
3.1.2. Encryption and SSL certificate
It is recommended to encrypt the connection of external participants.
estos strongly recommends using HTTPS with a trustworthy SSL certificate. The certificate should be issued by a public certification authority (Certificate Authority/CA), which is classified as trustworthy by all common browsers and operating systems. If necessary, apply for an SSL certificate for your DNS name from a public certificate authority.
If you work with a self-signed certificate (Self Signed Certificate), the connection is encrypted, but not secure, and the use of browser applications may not be possible.
Trusted certificate required
A trustworthy certificate is mandatory for the use of browser applications.
Port forwarding
In the case of Port forwarding, all requests from the internet are received directly by UCServer web services. This is also responsible for encrypting the connection. The certificate must be stored in the UCServer.
Reverse proxy
If the UCServer WebServices are published via a Reverse proxy, all requests from the internet are first received by the proxy and then forwarded to the UCServer Web Services. The proxy is thus also responsible for encrypting the connection.
The SSL certificate must be entered in the reverse proxy.
3.1.3. Required port and firewall rules
The required port and firewall rules depend on the topology of the network and the services of the UCServer to be published or the estos services used on the internet. The following list shows what generally has to be set up in the routers/firewalls.
In general, the routers/firewalls must be set up in such a way that a connection once established remains open and all additionally required/requested ports can be used.
Push service only
Outgoing | |
|---|---|
Source | UCServer |
Destination | |
Port | 443, TCP |
UCServer Web Services
Publishing the server via NAT
Incoming | |
|---|---|
Source | all |
Destination | UCServer |
Destination port | HTTP: 7224 TCP and/or HTTPS: 7225, TCP |
UCConnect
Outgoing | |
|---|---|
Source | UCServer and all ProCall clients |
Source port | all |
Destination | |
Destination port | 3478 and 443, UDP and TCP |
estos STUN/TURN server
Publishing the server via NAT
Incoming | |
|---|---|
Source | all |
Destination | estos STUN/TURN-Server |
Destination port | 3478, UDP and TCP |
Release of local participants
Outgoing | |
|---|---|
Source | UCServer and all ProCall Clients |
Source port | all |
Destination | estos STUN/TURN Server |
Destination port | 3478, UDP and TCP |
Limitations
Note that for a UCConnect or push connection the UCServer service needs an outgoing HTTPS connection to *.ucconnect.de. The UCServer does not support connection via an (outbound) web proxy for this purpose.
This must be bypassed for the connection.
3.2. Configure WebServices interface in UCServer
If some or all functions of UCServer are to be accessible externally and UCConnect is not used, the UCServer WebServices must be accessible via the internet.
3.2.1. IP address and port
You can view and change the IP address and the port defined for the web services in the UCServer Administrator menu under Tools – Network interfaces. The mobile apps must be able to access the IP address/port combination entered here from external/the internet.
Sample screenshot: estos UCServer Administrator – Network interfaces
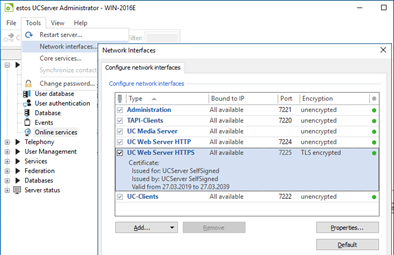
By default, the UCServer answers requests via HTTP on port 7224 and HTTPS on port 7225.
If the UCServer is published via another port, this port should also be entered and used here.
3.2.2. Enter certificate
The connection between mobile apps and the UCServer via the internet should always be encrypted.
If the publication is made without using an HTTP proxy, a valid certificate must be stored in the UCServer.
Sample screenshot: UCServer Network interface properties – Choose a certificate
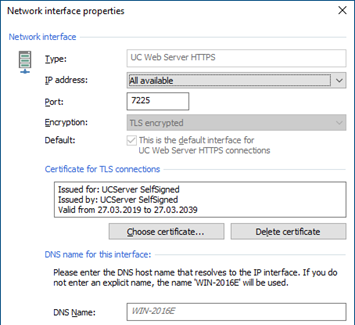
Please note the information under encryption and SSL certificate.
To store a certificate, double-click on the UC Web Server HTTPS entry and click on Select certificate...
3.3. Mobile app without audio/video and softphone
3.3.1. Publishing the UCServer Web Services
Together with the UCServer, a web service is always installed which is permanently connected to the UCServer. These UCServer WebServices enable you to use the functions:
- Presence
- TextChat
- Control of the telephone line
- Contact search
To be able to use these services in the ProCall mobile app and the web applications not only in the local network but also via the internet, the UCServer web services must be available on the internet.
Two scenarios can be distinguished for the publication
Publication without DMZ
- The UCServer has a public IP address, i.e. it is directly connected to the internet (not recommended and not explained)
- The UCServer has no public IP address, i.e. it is located behind a NAT device, and port forwarding is used.
Publication with DMZ
- The UCServer has no public IP address, i.e. it is located behind a NAT device, and HTTP reverse proxy in a DMZ is used.
Note that the UCServer should be accessible in the local network and the internet under the same name.
Please see here: Requirements – public IP address and DNS
Additionally, push messages should be sent to mobile apps. The service is set up automatically when the UCServer is configured.
Authorization to send push messages
The firewall on the UCServer computer and on the gateway to the internet must be set up so that the UCServer can send the push messages to ucpush.ucconnect.de:443.
3.3.2. Publication without DMZ
In this scenario, the UCServer is separated from the internet by a firewall/router.
Configure port forwarding on your NAT router. Forward the incoming connections (on your public IP address e.g. on port 443 TCP) to the HTTPS port of the UCServer web services (default: 7225).
SSL certificate
Make sure to store a valid certificate in the UCServer Web Services to be able to encrypt the connections. Follow the instructions in 3.1.2 Encryption and SSL certificate.
3.3.3. Publication with DMZ
If the UCServer web services are to be published across a DMZ, an HTTP reverse proxy must be used, i.e. a server that receives HTTP(s) requests and forwards them to a server in the private network.

SSL certificate
In this case, the SSL certificate must be entered in the reverse proxy.
In the case of an HTTP reverse proxy, all requests from the internet are first received by the proxy and then forwarded to UCServer web services, so the proxy is also responsible for encrypting the connection.
Please note the information in 3.1.2 Encryption and SSL certificate.
Depending on your requirements, you can forward the requests within your network (LAN).
- via unencrypted HTTP
- or with TLS encryption
HTTP reverse proxy
All standard-compliant HTTP reverse proxy servers that allow HTTP GET and POST and web socket connections (RFC 6455) can be used.
The proxy server must be set up to forward requests coming from the public IP address to the UCServer WebServices.
The required IP address and port information for UCServer web services can be found in the UCServer administration.
Please take note of any useful information and configuration examples for HTTP reverse proxy.
3.3.4. Setting up the UCServer
The setup of the UCServer is independent of whether it is to be released via NAT or an HTTP reverse proxy.
Start the UCServer administration.
Open General – Online services.
Under Use your own server... start the wizard for the configuration via the button Configure now...
Sample screenshot: estos UCServer Administrator – General – Online services – Configuring now

When the wizard is started for the first time, the privacy policy and agreement for DPA (Order Data Processing Agreement) are displayed.
Both must be approved before the push services can be used.
Click Next to continue the wizard.
Specify the hostname (on the internet and on the local network) entered in the DNS and specify the port.
Via Check connection... a test program is started which executes the following:
- Connection to the internet
- Check the DNS resolution
- Connection to the server found
All tests must be successful in order to ensure the function. In case of an error, you can also start the wizard by clicking Next... and analyze the problem later.
Since audio/video chat and softphones should not be used, the last window can be closed without any information by clicking Finish and the notification message can be skipped with Yes.
Sample screenshot: estos UCServer setup – Define hostname and port
The publication of the UCServer web services and the configuration for sending push messages is complete.
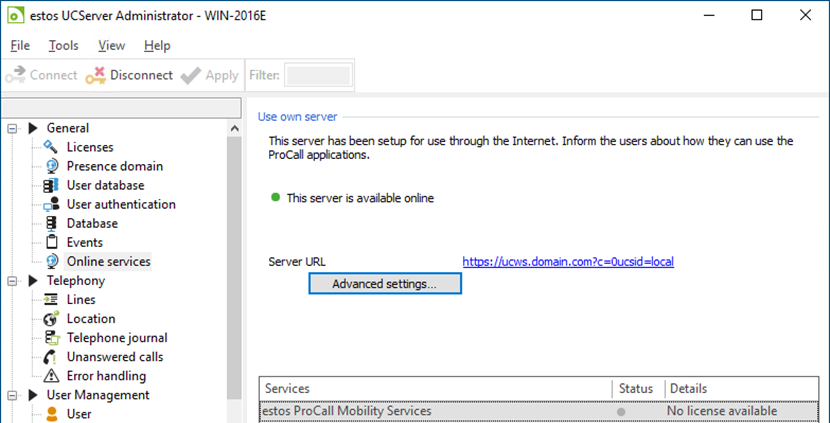
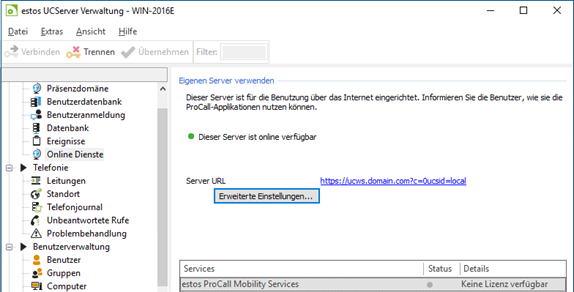
After configuration, the availability of the server is displayed.
Sample screenshot: estos UCServer Administrator – General – Online services – Advanced settings
Set up users
As the last step, the users must be set up and optionally notified by e-mail.
3.4. Use the mobile app with audio/video and softphone externally
If the clients' voice services (ProCall for Windows, mobile app) are only used in the local network, the clients can establish a direct connection to the UCServer and to each other to exchange voice packets.
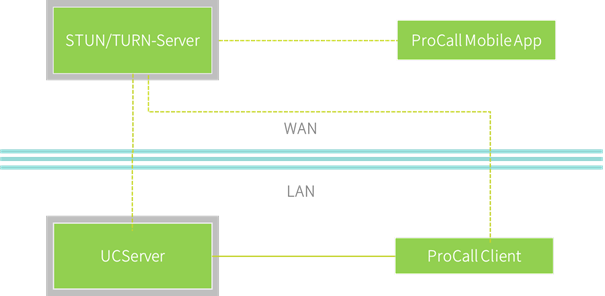
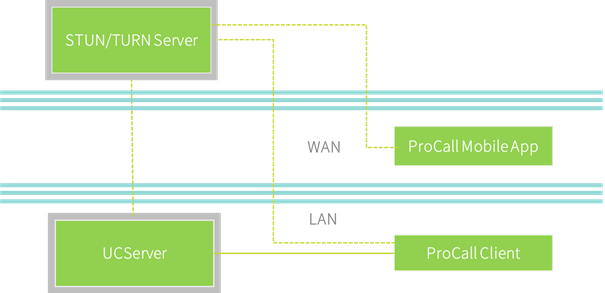
If the clients involved in the communication cannot establish a direct connection to each other and/or to the UCServer, a STUN and a TURN server is required for the transmission of audio data.
In this case, all clients involved in the communication need a connection to these servers. The STUN/TURN server must therefore be accessible from the internet.
There are basically two ways to use a STUN/TURN server:
UCConnect
- Hybrid cloud service from estos -> available on the internet
- easy to set up
- low demands on the network configuration
- recommended for small and medium environments
estos separator STUN/TURN server
- must be provided by yourself
- STUN/TURN server must be accessible from the internet
- UCServer web services must be accessible from the internet
- relatively easy to set up
- low demands on the network configuration
- for medium and large companies
For detailed information on how STUN/TURN and ICE work, as well as explanations of other required functions and components, see Information on STUN/TURN.
3.4.1. UCConnect
With UCConnect, estos offers an easy way to provide mobile apps with all functions including audio/video chat and softphone.
Among other things, UCConnect provides the necessary functions for voice transmission between participants.
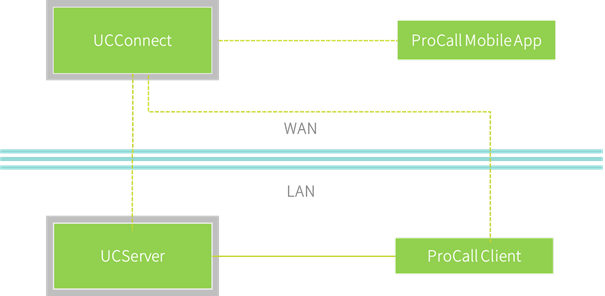
Basic preparation: Connection of clients and UCServer to UCConnect
The firewalls/routers must be set up so that all internal ProCall clients and the UCServer can establish a connection to UCConnect.
The UCServer must also be able to send data to the push service.
Observe the notes below: Required port and firewall rules.
It is not necessary to publish the UCServer WebService and set up the push service.
Setting up UCConnect in the UCServer
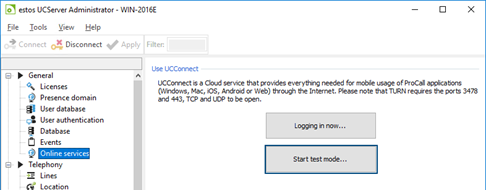
Start the UCServer administration and open under General – Online services.
You can now start a test run or log on to UCConnect with the server ID.
Sample screenshot: estos UCServer Administrator – General – Online services – Start test mode
You can manage your server and the required licenses in the UCConnect portal via the website https://portal.ucconnect.de.
If you have not yet created an account in the UCConnect portal, you can go directly to the portal website and register or use the test mode.
Sample screenshot: Log into UCConnect
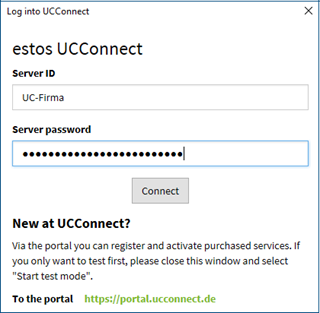
The license information is displayed when the UCConnect connection is first started/established. The UCConnect services, including the push services from Apple or Google, can only be used in full if you accept the displayed conditions.
After entering the UCServer ID and Server password, click Connect. The UCServer automatically checks the connection to UCConnect and displays the result.
Sample screenshot: estos UCServer Administrator – STUN and TURN test passed
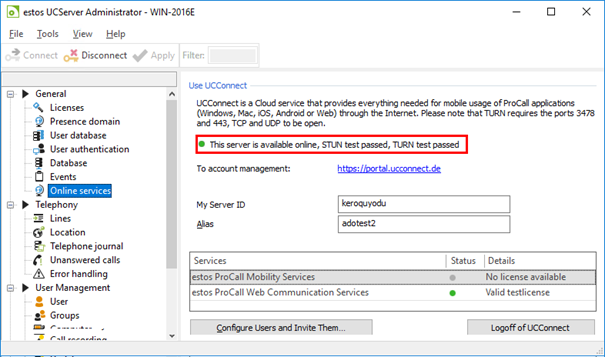
If no connection could be established, please check your firewall/router configuration.
In the lower area, you can check your licenses. They can be entered and deleted via the UCConnect portal.
The last step is to set up the users and optionally notify them by e-mail.
The procedure for setting up and managing users and mobile apps is explained in Chapter 4.
3.4.2. Use estos STUN/TURN server
If you want to operate and provide a STUN/TURN server for your company yourself, you must install the estos STUN/TURN server and make it available on the internet.
All components involved (UCServer, clients in the local network, mobile apps) must be able to establish a connection to this server.
The estos STUN/TURN server is included in the ProCall Enterprise download, the license is included with ProCall Enterprise.
Login functions must still be provided by the UCServer. For this, the UCServer Web Services must also be accessible from the internet. See also 3.3: Mobile app without audio/video and softphone (Publishing the UCServer)
Requirements
- The estos STUN/TURN server must be installed so that it can be accessed from the internet (i.e. via an external IP address).
- It can be published via NAT or bound directly to a public IP address.
- The estos STUN/TURN server must be accessible from the local network and the internet under the same name e.g. turn-uc.domain.com and the same EXTERNAL IP address.
See 3.2.1 Public IP address and DNS - The UCServer and the internal ProCall clients must be able to establish a connection to the estos STUN/TURN server on the internet.
Installation and configuration of the estos STUN/TURN server
The installation and setup of an estos STUN/TURN server is started simply by double-clicking on the installation package "STUN_TURN_Server_x.x.x.xxx.msi". Afterwards, the configuration wizard starts, which leads through the individual necessary setup steps. Afterwards, the service is ready for use.
For the operation of the estos STUN/TURN server, some settings are necessary. To make these settings the administration program of the estos STUN/TURN server is used.
The required settings depend on the system environment and the desired scenario. It is recommended to publish the server via NAT.
General
Incoming connections from the internet must be passed on to the connection data defined here.
Sample screenshot: estos STUN/TURN Server Administration – General – IP-address and port
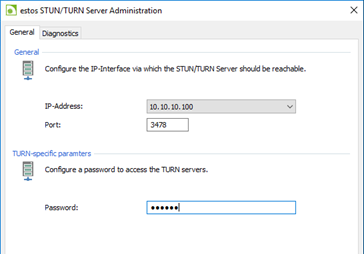
IP address and port | Select one of the local IP addresses of the computer. The default TCP/UDP port for the server is port 3478. |
|---|---|
Password | Since the transfer of media data between the clients requires high bandwidth, access is password protected. This must also be entered in the UCServer. The password should not contain umlauts. |
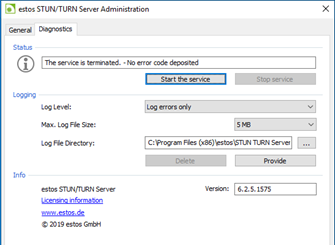
Diagnosis
Status | Here the service can be started and stopped. |
| Logging | Set the log level to debug mode only for debugging purposes. If necessary, the size of the log file can be changed. |
| Info | The version of STUN/TURN server and installed UCServer should match. |
Sample screenshot: estos STUN/TURN Server Administration – Start diagnostics
Start the service and finish the configuration with OK.
From now on the STUN/TURN server is available.
Configuration of the UCServer
Start the UCServer administration.
Open General – Online services. Under Use own server start the wizard for the configuration by clicking the button Configuring now...
Sample Screenshot – UCServer Administrator – General – Online services – Configuring now...

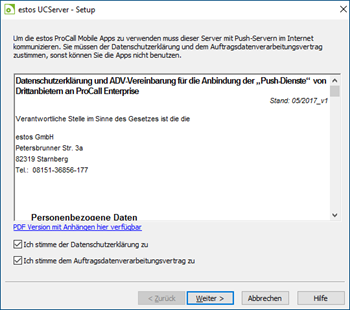
When the wizard is started for the first time, the Privacy Policy and Agreement for ADV are displayed. Both must be agreed upon before the push services can be used.
Example screenshot: UCServer Setup – Accepting the contracts Privacy Policy and ADV
Click Next to continue the wizard.
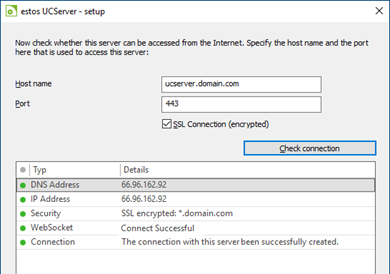
Specify the hostname (on the internet and on the local network) entered in the DNS and specify the port.
Sample screenshot: estos UCServer setup – Check connection
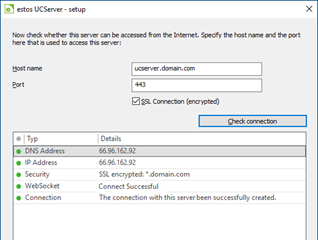
Via Check connection a test program is started which executes the following:
- Connecting to the internet
- DNS resolution check
- Connection to the server found
All tests must be successful in order to ensure the function. If an error occurs, you can also continue the wizard by clicking Next and analyze the problem later.
Sample screenshot: estos UCServer setup – Use and configure own servers
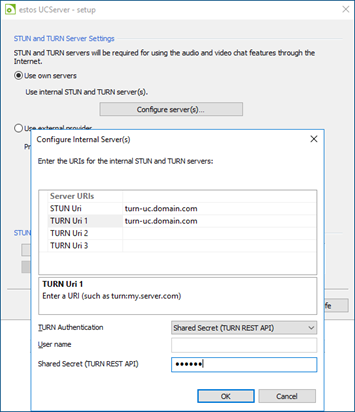
After that in the selection Use own server – Configure internal server the DNS name of the estos STUN/TURN server must be specified. The name must be entered both as STUN Uri and as TURN Uri.
Select Shared Secret (TURN REST API) for TURN authentication.
Enter the password that you have assigned in the estos STUN/TURN server configuration under General.
Finish input with OK.
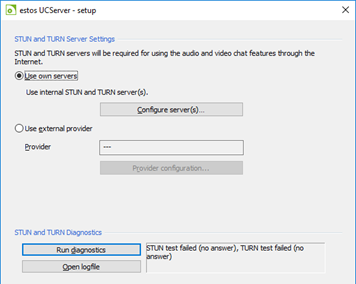
Finally, you can use Execute diagnostics... to check if the UCServer can reach the estos STUN/TURN server.
Sample screenshot – estos UCServer setup – Use own servers – Run diagnostics
The configuration of the UCServer for the use of mobile apps is now complete.
As the last step, users must be set up and optionally notified by e-mail.
Example screenshot UCServer Administration – General – Online services – Advanced settings
The procedure for setting up and managing users and mobile apps is explained in Chapter 4.
4. Set up and manage users and the mobile app
By default, every ProCall user is authorized to use the mobile apps. This authorization is assigned via the Global Settings and/or directly on the user object.
After configuring the UCServer for UCConnect or setting up the estos STUN/TURN server, users can be set up and notified via a wizard in the Online Services area.
Start the wizard via the Configure and invite user button
Initially, users who are not yet authorized can be activated.
Example screenshot UCServer Setup – Activate user
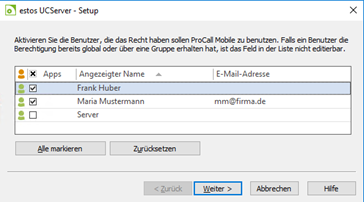
In the next step, you can use the Send e-mails button to send an email to the users selected by a checkmark, which will contain the links to download the mobile apps and instructions on how to set them up.
You can also enter an additional message.
Exit the wizard with Finish.
The configuration to be able to use the mobile apps with presence, text chat, control of lines and contact search also on the Internet has now been completed.
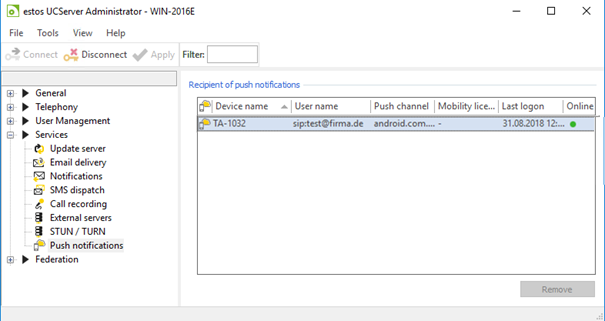
4.1. Registered mobile apps
After restarting the mobile apps, the devices registered on the UCServer are displayed under Services – Push notification.
Sample Screenshot: estos UCServer Administrator – Services – Push notifications – Recipient of push notifications
4.2. Setting up the mobile app
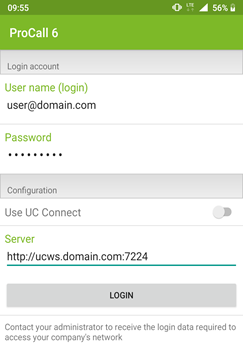
After installing the mobile app, it must be started and the connection data entered.
To log in, enter the login data username and password for logging into the UCServer.
If the UCServer is connected to UCConnect, activate the option Use UCConnect.... and specify the server ID. The mobile app will automatically connect to UCConnect.
If you use estos STUN/TURN server, disable Use UCConnect and enter the IP address or name of UCServer.
Login Account/Login
Enter the username and password for logging onto the UCServer
Sample screenshot: User login for Android
Sample screenshot: User login for iOS
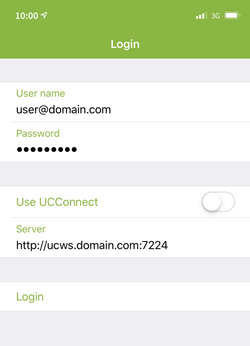
Use UCConnect
- Enable this option if the UCServer is connected to UCConnect. The app will automatically connect to the UCConnect servers.
- If you use the estos STUN/TURN Server, deactivate Use UCConnect
Server-ID for UCConnect
If UCConnect is used, specify the server ID.
STUN/TURN
If the estos STUN/TURN server is used, the IP address or the name of the UCServer must be specified.
After entering all data press Login
More useful articles
- Best practice: Publish UCServer configuration for external access
- Interesting facts about STUN/TURN for the use of audio/video and softphone with ProCall Enterprise
- Setting up UCConnect – Using STUN/TURN