Best practice: ixi-UMS 7 Business upgrade – process for major release changes from version 6.x to 7.x
April 2021. From ixi-UMS 7 Business Release 7.01.0.23
Update – within a major release
ixi-UMS Business can be updated within a major release version (e.g. from version 6.4 to 6.5) by "over-installation". All settings are retained.
Upgrade – changing major release
Changing a major release from ixi-UMS 6 Business to ixi-UMS 7 Business requires a completely new installation. An upgrade by "over-installation" is not possible.
Steps to do for an upgrade
Export/Save data from ixi-UMS 6 Business -->
- Uninstall the previous version of ixi-UMS 6 Business -->
- Install the new version of ixi-UMS 7 Business -->
- Restore/Import data -->
- Complete upgrade installation
Export settings
By starting the setup of ixi-UMS 7 Business all settings of ixi-UMS 6 Business can be exported. Those settings can be imported while the subsequent installation of ixi-UMS 7 Business.
Save when exporting
- ixi-UMS 6 Business configuration
- settings of XCAPI
- locally created/stored users and user settings
Import data: Installation path and IP addresses
ixi-UMS Business must be installed in the same path and the computer must have the same IP address.
Archiving Journal data
Journal data are not taken over and cannot be imported subsequently.
For archiving these data, you have to save the folder "..\ixi-UMS Business\ixi-UMS Kernel\DB".
Save and take over the user announcements
Announcements of users have to be saved first and back copied into the system after an installation of ixi-UMS 7 Business.
Announcements of users are stored in the following folders.
| Version | Folder |
|---|---|
| ixi-UMS 6 Business | ...\ixi-UMS Business\ixi-UMS EnhVoc\Users |
| ixi-UMS 7 Business | ...\ixi-UMS Business\ixi-UMS Voice-Mail Server\Users |
A special folder is created for each user.
After installing ixi-UMS 7 Business, copy all folders into the corresponding directory.
Upgrade procedure (major release change) from ixi-UMS 6 Business to 7 Business
In the following, the process of an upgrade from ixi-UMS 6 Business to ixi-UMS 7 Business is shown (major release change).
Save ixi-UMS 6 Business settings
Start the ixi-UMS 7 Business setup on the system where ixi-UMS 6 Business is installed.
You will get the information, that an installation of ixi-UMS 6 Business has been detected and the settings might be exported.
Sample screenshot: ixi-UMS 6 Business Export

If you do not want to save (export) data, you have to setup ixi-UMS 7 Business completely new after the installation.
If you want to export settings, select the folder for saving data.
Sample screenshot: ixi-UMS 6 Business Configuration Import
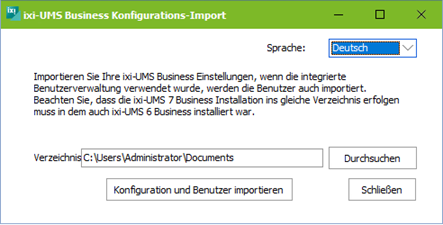
Start the Export by clicking on "Export configuration and users“
Close the export tool after finishing the export.
Uninstall ixi-UMS 6 Business
After saving the configuration, ixi-UMS 6 Business has to be installed for use ixi-UMS 7 Business. For this, you can start the system control in Microsoft Windows.
Sample screenshot: Microsoft Windows System Control – Programs and Features

All installed components will be uninstalled. This process may take a few minutes.
ixi-UMS Business SIP (integrated XCAPI by TE-Systems)
Using ixi-UMS Business SIP (integrated XCAPI by TE-Systems) you have to restart the computer/system after uninstalling ixi-UMS 6 Business
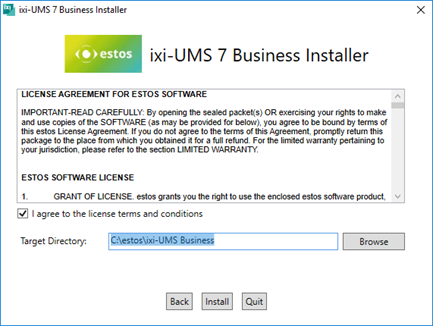
Install ixi-UMS 7 Business
Start ixi-UMS 7 Business setup and proceed with the required steps.
Sample screenshot: ixi-UMS 7 Business Installer
Installation path
To take over the saved settings to ixi-UMS 7 Business, ixi-UMS 7 Business must be installed in the same path where ixi-UMS 6 Business was installed.
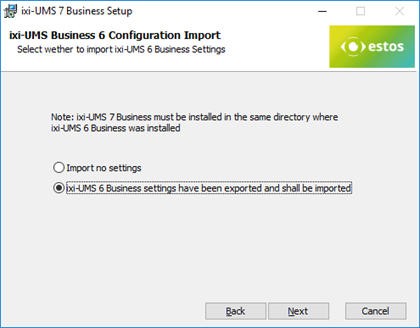
Import settings of ixi-UMS 6 Business
While installing ixi-UMS 7 Business, you are asked about importing an existing configuration.
Select the option "ixi-UMS 6 Business settings have been exported and shall be imported“ and proceed with the setup.
Sample screenshot: ixi-UMS 6 Business Export
Specify the folder of saved data at the end of the setup.
Sample screenshot: ixi-UMS Business Configuration Import
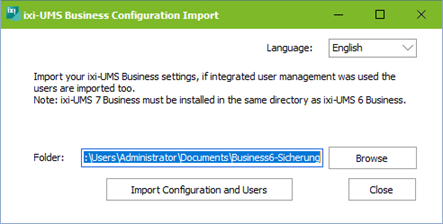
When installing ixi-UMS 7 Business on the same computer/system, the path of the previous export is already preselected.
Select "Import configuration and users“.
The wizard is closed after successful import, installation is finished.
Finishing the installation
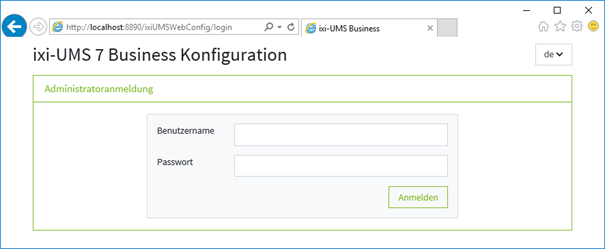
After finishing the installation the ixi-UMS 7 Business web configuration is started.
Sample screenshot: ixi-UMS 7 Business Configuration
Clear browser cache
In order to display the new ixi-UMS 7 Business web configuration interface correctly, the browser cache must be cleared.
Login and enter the License for ixi-UMS 7 Business.
Check settings and proceed with configuring the new options.
Further Information
Move data for ixi-UMS Business (e.g. moving to a different server)